Chicken tractor design
Chicken tractor design is a mobile cage for your chooks.
There's only one requirement for your cage; it must be light and easily moved. Roughly every two weeks, or less, it should be transported to a new spot. Well, it needs to be dog proof too.
They come in many shapes and designs, determined by the layout of your garden and just how important beauty is to you.
This page was last updated by Bernard Preston on 7th August, 2019.
If you want a pretty chicken tractor, don't try bending electrical conduit; it is not easy to get it at exactly the right spot; a geodesic dome is more pleasant to the eye, but too large, or low, for us.
This one is functional, but not the most beautiful; but it suits our needs perfectly.
You will need a bending spring which you can borrow perhaps from your friendly electrician. Because I used a lot of conduit for building my solar farm, I already had two; one small and the other large.
A dome shaped chicken tractor design would be better suited to what I facetiously call the Windsor Castle garden, with a dozen serfs doing the donkey work; but it's round and that may not fit your home.
I have to admit it's a lot prettier but it is impossible to move a structure that shape and size about our area.
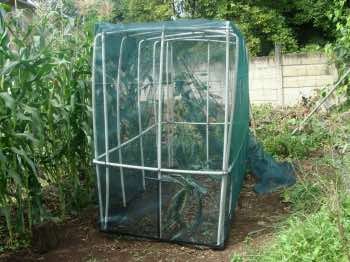
Our beds are large and rectangular so I made up this shape. It consists of an angle iron frame for the base, with electrical conduit for the superstructure, and covered with shadecloth.
Notice there are two handles at either end for easy lifting.
Then there are 15cm long steel rods that fit neatly inside the base of the conduit giving them support and strength.
It also will be difficult for any vermin to get under the sides.
Chicken tractor design
Chicken tractor design must be made to fit your garden. I chose to make mine 2,5m long x 1,2m wide. She who must be obeyed thinks it's too big, but I wanted to have enough room for at least 3 chickens as our grandson frequently joins us for eggs Florentine for breakfast.
In fact it's a little too heavy; next time I would choose thinner angle iron.
Each corner of my chicken tractor design is braced with a short piece of angle iron. You will need access to a welding machine to make this.
A little aside; I have a welder that doesn't draw a huge current but I was a little anxious using it with our large 10kw inverter because of the surges and spurts associated with welding. This week I forgot to change the electricity back to the utility, and our solar powered generator handled the load just fine.
Then I welded 16 steel rods, 20mm thick and 150mm long at strategic positions; choose the bar carefully so the conduit fits snugly over it.
I made holes in the end of each bar with a drill press in case we needed to wire the conduit down, but it hasn't been necessary. I haven't had a high wind yet, so they may well in the future prove useful.
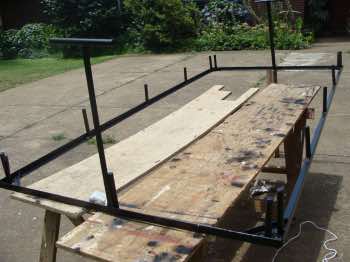
Make sure you leave a couple millimetres between the bar and angle iron so you can slip the conduit over it.
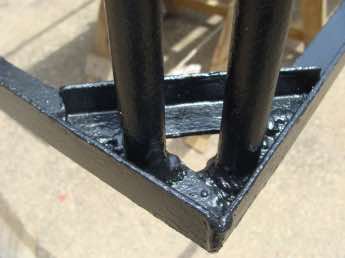
It all needs to be strongly welded, any sharp spots ground off with an angle grinder, and painted first with a lead primer and then a top coat. I put two of each to be sure, which is perhaps overkill.
Yes, you do need the tools to do this; being a handyman, not only at the chiropractic clinic, makes a difference.
The cost of the tools to my mind must be offset against employing someone else to do the work; I bought the welder for this chicken tractor. But last week, just before harvesting the honey, I noticed that the guides on my extractor were nearly worn through.
I would have had to completely dissemble the part, take it to a qualified artisan at considerable trouble and expense; the welder is already paid for, and I've learnt a new skill.
It's part of my philosophy of life; I'd rather be learning new things, mastering different tools and enjoying myself than watching others having a ball on TV.
I find myself in good company having just been instructed by my granddaughter to read Roald Dahl's Mathilda; he describes the television as the dreaded box, and so it is, with its uses periodically.
But I digress, so let's get back to the chicken tractor design.
The next step is to measure out five lengths, in my case, of conduit. I decided to make this chicken tractor design 1.8m high so we could easily walk around inside it. You could make your lower.
So each length was (1.2) + (1.8x2) = 4.8m.
I had to join on a piece of conduit, using a joint and PVC weld, as they come in 4m lengths.
You really do need that bending spring which you can see attached to a length of nylon rope.
Slide it down the conduit until it straddles where you plan to bend the plastic pipe. Thereafter you can pull it out using the string.
The material expressed on this page is gleaned from the nutritional and environmental literature; it is clearly referenced. A plain distinction is made between the author's opinion and that which is scientifically proven. When in doubt consult your health professional.
To suggest a correction or clarification, write to Dr Bernard Preston here. Contact.
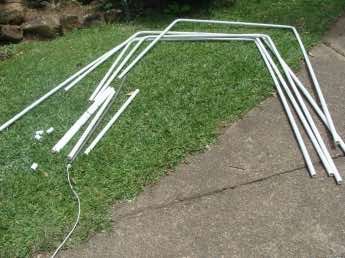
An experienced electrician could no doubt bend the conduit more neatly than I.
Notice the handles at each end to facillitate moving your chicken tractor.
Now is the time to measure off, bend and cut the three struts that run lengthways along your chicken tractor. You could measure them but I decided to do each one separately as they weren't exactly equal. You can see the first one in place, running in the handle. Again you'll need a joint, glued with PVC weld, as they are more than 4m long.
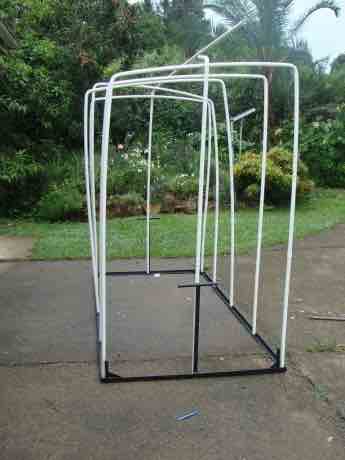
This large structure is in fact too big to carry down to our garden, so we disassembled all the conduit, took them down to the vegetable patch, and did the final installation in situ.
I now ran one length of conduit all around the above structure; in fact I made it 70cm above the ground but that was too high to step over with ease.
If I did it again, I'd rather make it 60cm.
Where the conduit crossed the uprights, each was drilled and tied with thin, malleable wire.
Drill a 2mm hole right through both lengths of conduit, thread the wire through and secure it.
Unfortunately I didn't take a photograph of an intermediate stage. After drilling and securing the conduits where they cross, including the length that spans the whole structure 60cm above the frame, you now have to brace the whole chicken tractor, across the corners, using strong nylon twine.
It needs to be tight, making the whole structure now very stable and steady. It looks unwieldy and fragile but is surprisingly strong.
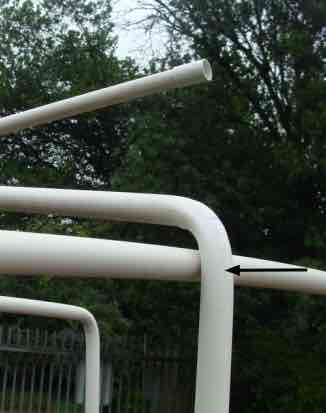
After bracing the whole, corner to corner, with twine, the next step is to cover your whole chicken tractor with shade cloth. It's a tedious process threading the twine along the base and firmly attaching the shadecloth to the base, up the sides and over the top.
I had to buy shadecloth 3m wide so it was either cut it, or on the roof double it; we chose the latter.
Incidentally, you can build the base on your own but once you start the superstructure it's definitely a job for two people.
What density shadecloth?
What density shadecloth is I believe not terribly important; I chose a 40%, fine enough to keep the bees out. The chooks will have to live in harmony with the rest of the garden and I'm a little anxious about the honeybees; I have a childhood memory of a whole pen being stung to death by an angry swarm of bees after we had robbed them of their honey.
There are many unique considerations in your own environment when considering a chicken tractor design. Are there snakes, or wild cats, your own dogs or a mongoose that have to be kept out?
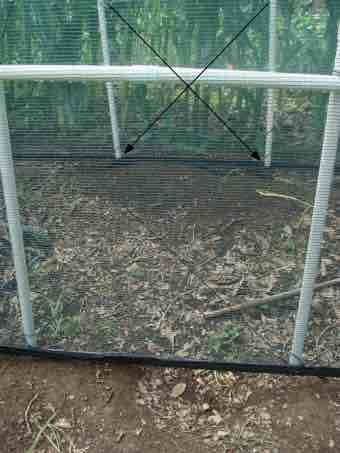
Now we are nearly there. All that remains to be done is to make a door, and a waterproof covering over part of the structure where your chickens will roost.
Choose one of the sections, cut out the shadecloth leaving enough for an overlap, and tie it securely around the conduit. Melting the ends of the nylon string with a match makes it easier to thread through the shadecloth. Today I will make the door, family permitting; it's Christmas day!
Happy Christmas!
For the door and roost you'll have to wait another day or two!
Chicken tractor gate
Chicken tractor gate requires two inexpensive eye bolts.
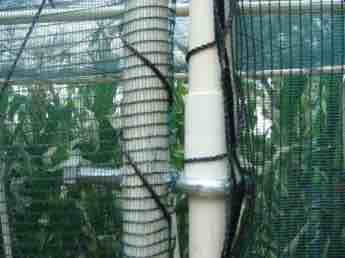
A small amount of aforethought is here required. Purchase two eyebolts, just the right size for your conduit. Drill holes through the uprights and fit your eyebolts.
Now, make your gate so that the join will be just above one of the eyebolts; it will support the weight of your gate.
Thread the gate through the eyebolts and then glue the joint using your PVC glue. Then, using your nylon string, fit diagonals and one tie directly across.
Now for a boring but important step; cut shade cloth to fit the gate, and using the nylon string, fix it firmly to the frame.
Hang in there; within a few hours you can have chooks in your chicken tractor.
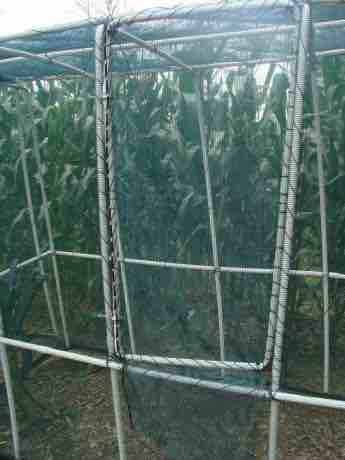
I now used a short length of 2,5 electrical wiring to make a simple tie to keep the gate closed.
The alternative to a chicken tractor design is to divide your garden up into paddocks; I'm leaning towards that; learning how to make a simple steel gate design isn't difficult either once you have your welder and offcut saw.
The chicken tractor roost
The chicken tractor roost is simple in design. Chooks originally were forest birds and at night nest in trees. They still like to roost above ground. It gives them protection against predators.
Make sure your roost is firmly supported from the frame; the birds are heavy.
Mark I below proved far too flimsy; so I used the drill press to drill holes about 8cm apart through the conduit tube, and through one end of the sticks. Then I wired them tightly to the frame. Tying with the nylon string proved totally inadequate.
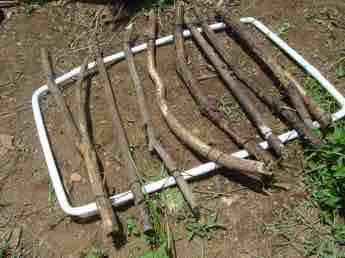
A waterproof tarp over the top to give them some protection against the weather is important too. It's best not to attach it to frame as in a high wind the whole structure will be blown away. Rather use staywires and tent pegs and secure it to the ground. Then it can fly away without ruining your chicken tractor.
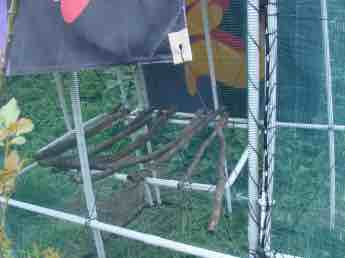
This Mark I above proved quite adequate.
Newsletter
Our newsletter is entitled "create a cyan zone" at your home, preserving both yourself and Mother Earth for future generations; and the family too, of course. We promise not to spam you with daily emails promoting various products. You may get an occasional nudge to buy one of my books.
Here are the back issues.
- Lifestyle and ideal body weight
- What are ultra-processed foods?
- Investing in long-term health
- Diseases from plastic exposure
- Intensive lifestyle management for obesity has limited value
- A world largely devoid of Parkinson's Disease
- The impact of friendly bacteria in the tum on the prevention of cancer
- There's a hole in the bucket
- Everyone is talking about weight loss drugs
- Pull the sweet tooth
- If you suffer from heartburn plant a susu
- Refined maize meal and stunting
- Should agriculture and industry get priority for water and electricity?
- Nature is calling
- Mill your own flour
- Bake your own sourdough bread
- Microplastics from our water
- Alternative types of water storage
- Wear your clothes out
- Comfort foods
- Create a bee-friendly environment
- Go to bed slightly hungry
- Keep bees
- Blue zone folk are religious
- Reduce plastic waste
- Family is important
- What can go in compost?
- Grow broad beans for longevity
- Harvest and store sunshine
- Blue zone exercise
- Harvest and store your rainwater
- Create a cyan zone at your home
Chicken wire
Chicken wire around the bottom is necessary. The shadecloth is quite flimsy, and our dogs managed to make a hole, so I have strengthened the chicken tractor design with 90cm wide netting.
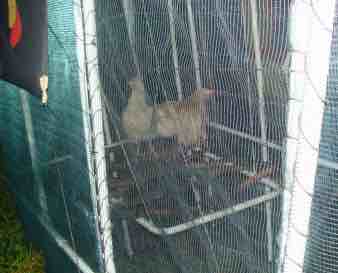
The birds seem very happy. I may raise it if predators seem a problem.
In act I have raised it to about four feet above the ground; the hens have no difficulty getting up there.
The chicken tractor nesting box
The chicken tractor nesting box is an important part of the design; they need a secure place to lay their eggs.
I've used a defunct grass catcher from our solar electric mower. Place some grass in it, or wood shavings from your planar and get a water trough and food tray and you're ready to get your "point of lay" chickens.
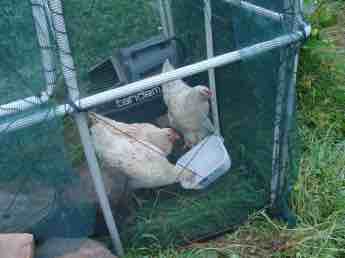
Obviously we're on a learning curve; an ice cream container won't do for a water trough. But with a half brick planted in the middle it works fine.
We have three grandchildren, so each chose a bird; we're ready to roll! Chickens in the garden have been a wonderful new project.
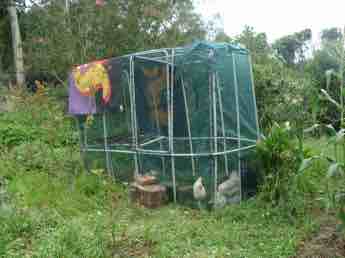
Chicken tractor design has been quite an exercise! Once again, what are the goals?
- Chickens will root out the weeds and make a patch of ground ready for the next crop; their eyes and beaks are far more attuned to the job of weeding than ours.
- Your hens are one small part of the race to end waste; they will eat most left overs.
- Simultaneously they will provide high nitrogen manure for the ground.
- Top quality eggs are to be had; fertile if you have a rooster.
Free range eggs fresh from the coop are without equal.
It's quite difficult to attach a monetary value to the above. Saving us time and money is not without merit. Weeding is not everyone's favourite activity.
Not having to buy inorganic fertilisers is of great value to the organic gardener.
This structure cost me about $100 and a week or so of my time, working a couple hours every day.
Feeding the chooks is certainly not for free, but using our own corn, and worms, we are hoping the cost will not be excessive.
The first egg
The first egg has just been found by our grandchildren; what excitement, but the chicken tractor design is just another step in the development of our backyard permaculture philosophy.
Eggs incidentally top the list in choline food sources; a deficiency of this vitamin is the cause of a host of inflammatory diseases.
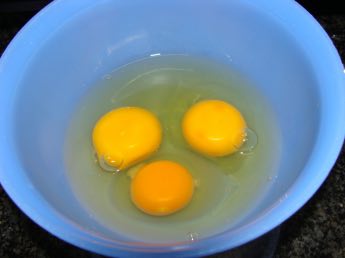
There's no need to point out which is the organic, fertilised egg, is there? It's just one more reason to make a chicken tractor design worth a consideration. You can be sure it is more nutritious too.
Do you know about testing eggs for freshness?
Can you feed eggshells to hens?
Can you feed eggshells to hens when they are confined to your chicken tractor design? To be honest, I'm unsure. There are reports that if there are eggshells obviously in the feed, then hens may take to pecking their eggs.
Since our hens are mostly free range now, and we dump the smashed eggshells on the compost heap, it's not a problem for us.
Certainly, the hens need copious amounts of calcium, like humans, I guess, only more so; if they don't get it the shells will be thin and the birds less well. Fortunately there are no couch potatoes amongst them; that's the most common cause of our brittle bone disease, rather than a dietary mineral deficiency.
Nutritious choice foods
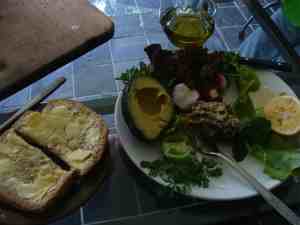
Nutritious choice foods are about improving your chances of living a long and fulfilled life. Simply enjoying 8-10 coloured foods every day reduces the all cause of death by 35%; that's massive. For those with a large garden one of these chicken tractor designs is a consideration.
For lunch today we had two kinds of lettuce, hummus which has real lemon, parsley, tahini and chickpeas; then there were peppers, spring onions, avocado, olives and low GI bread, rich in flaxseed. Smothered with butter and homemade gooseberry jam, we've already had our ten colours, all in one meal. It's really not that difficult with a little planning and aforethought; a gourmet delight of subtle flavours. We look forward to our veggies grown using manure from the first chicken tractor design.
- Grinding flax seeds - yields a great source of daily fresh anti inflammatory omega-3.
The wonder of worm farms
The wonder of worm farms complements your chicken tractor designs beautifully. So does starting a compost pile.
Our chooks will be fed from the wormery; they double in number every 30 days producing a huge surplus, making a gourmet meal for the chickens.
The worms breed explosively, going from 1000 to 2 million in one year, given enough food. So you can happily scoop out a handful of worms every day for your chickens. When starting a compost pile, toss them in too.
Meantime, until our worm farm is in full production, the chickens love to join me when I'm opening a compost heap; a feast awaits them. I let them roam through the vegetable garden for an hour every evening, keeping them out of the green beans which they love, presumably for the extra protein. Since we started this practice, the definition of cutworm has become purely academic.
Bernard Preston
Bernard Preston is a semiretired DC, food-nut and garden freak; solar geek and author too. Oh, and a Christian and lover of life; and a chicken tractor design geek.
That's a balancing trick for every Christian and one of the great paradoxes; "he who loves his life will lose it...". Does God expect us to be miserable? The apostle Paul encourages a young convert to trust in the living God, who gives us all things to enjoy. (1 Timothy 6:17)
Certainly I have had a lot of fun with this chicken tractor design; for me it's one small step in preserving and respecting God's creation.
Part of it respecting our bodies too; we are also the "temple of the Holy Spirit." Eggs from these chickens have three times the omega-3 compared to commercial hens. That means less inflammation, and better brains for our grandchildren.
Bernard Preston thinks that every able-bodied male, and there is no reason why a woman couldn't as well, should learn to weld; with these new inverter machines and auto darkening helmets it is really very easy. See this simple steel gate design that you could make for your garden.
When browsing use right click and "Open Link in New Tab" or you may get a bad gateway signal.
Did you find this page interesting? How about forwarding it to a friendly book or food junkie? Better still, a social media tick would help.
Address:
56 Groenekloof Rd,
Hilton, KZN
South Africa
Website:
https://www.bernard-preston.com