- Bernard Preston homepage
- Solar geek
- Solar Generator
Solar Generator
Solar generator is about capturing the sun's energy and using it in your home.
The year is 2021 and it's now time for yet another upgrade; I am about to add a new string of three big panels, 545 watts each. It adds complications because the voltage is different. Plan to build as large a system as you can afford from the beginning.
Use the largest size panels available, and try to keep them the same. If I was starting from scratch today, I would go straight for 20 of these beauties; but I have to mix and match.
2021 is actually a good time to jump in; these big-panels have double the power, are more efficient, and yet cost much the same as those of yesteryear.
This
blog is essentially about installing solar panels on your roof. The
nuts and bolts of it, the pop rivets and a few thoughts on series and
parallel installations.
Installing a home solar power generator is not without its pitfalls. Not least of which is that you are dealing with potentially lethal high-voltage systems.
Knowing your level of incompetence, before you start is vital. With that in mind, you either go on an educational expedition, probably informal, which is what I did, or you pay someone else a large sum of money to do the job for you.
New challenges have been a feature of my retirement sentiments but nevertheless it is a sombre thought that exceeding your level of incompetence in the matter of home solar power could lead to your demise.
This page was last updated by Bernard Preston on November 11, 2021.
- Bernard Preston homepage
- Solar geek
- Solar Generator
Small beginnings
Whilst small beginnings are inevitable whilst learning the basics, I would never start again with less than nine of these large panels; it is the same amount of work to put up a big or small PVs.
If you can't afford these at around $200 apiece, rather save more first; you won't be sorry.
Then you can add another string of nine in parallel giving you nearly 10,000 watts; that's significant.
General advice is not to have more than two strings in parallel on one MPPT regulator, but I broke that rule in my ignorance with no problems.
Solar Generator
Solar generator is about the nuts and bolts of fitting PV panels to your roof; it's the best way to celebrate Earth Hour.
It is not for me to decide whether you can install a solar generator system; that you must work out. But, to be honest, I started this lark with some theoretical background, but little practical experience. I am a chiropractor, after all. Hands-on stuff is right up my street, though.
Is it up yours?
There are always technical people in your neighborhood to give you advice and assistance; use them without embarrassment. That is what they are there for.
Here is my solar panel system. I started foolishly with four small 90 watt panels, thinking it was only for lights and computers, and now have extended it several times to a 3.2 kilowatt solar farm; and now again to 4.1kW, and finally up to 5.0kW; that is enough for our home.
Well, is it? After a huge power surge from the utility in 2018 that caused massive damage down the street, we are now thinking seriously of going off the grid; and so have added another 5kW of panels and two lithium batteries. Going solar always seems to be a work in progress.
Folk start doing crazy things for a variety of reasons. A neighbour remarked that it looks like aliens have landed on my roof one dark night. And so it does, when you include the passive solar water heaters.
If you're concerned about appearance, then certainly give Elon Musk's solar tiles a thought; they are the future.
You can start small if you feel insecure like I did, and make allowance for adding more panels, but here's a bit of advice. Accept that you will almost certainly want to grow the system once you discover the joy of the utilising the sun's free energy; and so don't start with tiny panels and a little regulator and inverter.
More than likely you will one day own a hybrid or totally electric car, and perhaps even go off the grid. Being able to charge all your toys from the sun is what I would want to do for Earth Hour, rather than march around with happy paraffin lamps and an inane smile on my face.
THE PETER PRINCIPLE
Every person rises or gets promoted to his or her level of incompetence.
Laurence J Peter
Home Solar Power
Home solar power is a wonder; can you imagine using four dollars of utility electricity per month?
Going solar, going green, is not for the fainthearted. For me it's been something of a journey. From very little background, reading, scouring the internet, questioning my knowledgeable patients, and talking to the experts has led me on a very exciting journey. It's culminated today in these two solar generators, the second erected yesterday, and today making all the connections, providing almost one hundred percent of our electrical needs.
I say "almost" as, at this stage, I have no intention of "going off the grid". Using my heavy carpentry machinery and the electric lawn mover is beyond our solar powered generator. Was beyond; now with 5kW of PV panels we can literally do anything.
THE STIMULUS
Why go green? Why build a residential solar panels system? For me it was simply that our electricity supply in the new South Africa is so unreliable; the threat of total blackout remains a reality. Whether it's brown outs, too low a voltage for our electrical devices, surges that blow your television and computers, or simply no power at all for an extended period which has become a feature of our lives, the decision to "go solar" has been an exciting journey.
Earth Hour
Earth hour, is it a fanciful notion, or a real possibility? Rather take some concrete action like building a solar generator, as far as I'm concerned.

These environmental studies students are celebrating Earth Hour, the 29th March. It's a lovely romantic picture but instead of adding yet more carbon dioxide to the atmosphere, I'd rather see them clambering on a roof erecting a solar generator. Is that sour grapes? Well, perhaps, yes.
Let's start planning now what we can do between now and the next Earth Hour to meaningfully make sure the Earth is habitable for our children's children.
So, how big a solar generator?
Up front it's important to decide how much home solar power you want from the sun. Just to run a few lights? Run a laptop? Then a one kilowatt inverter is sufficient, but let me warn you that the greed factor will kick in. Having discovered that the sun delivers its energy, generously, for free, you will want a lot more of it.
My advice, plan a system,
where you can add more solar panels and, if you live in a country with
an uncertain supply, more batteries, without having to increase the size
of the guts of the system; the inverter and the regulator. Purchase at least a five kilowatt inverter and a sixty amp regulator from the start if you can possibly afford it. I'm now wishing I'd bitten the bullet and put in a ten kilowatt inverter; but they are expensive; in fact, I eventually did it.
For more about the inverter and regulator and the general principles involved you can follow the link below to solar power energy.
So, here are the nuts and bolts of fitting your own residential solar panels.
So, you want to install solar panels on your roof to supply you with free electricity; that's great. It takes a little planning and some odd job skills. That's not difficult for the average man or lady, for that matter; anything a brave can do, a squaw can do just as well.
All you require is two basic items:
- Four steel brackets
- Angle iron.
- And of course a south facing roof if you live in the northern hemisphere.
One small caution to add to the pea soup. Chemists will tell you that using aluminium and iron in contact with each other is not clever. In twenty years' time my children's children may have problems with corrosion.
A sturdy extension ladders is a necessity. Nothing will spoil your solar generator project like a fall from the ladder. Get someone to support the ladder as you climb up and especially down; extend the ladder well beyond the gutter, and tie it securely to the rafters.
The brackets need to be fairly heavy duty, protruding through the roof and supporting the angle iron that will carry your photo voltaic panels. Get them bent to size locally. Eight of these cost about 25 dollars.
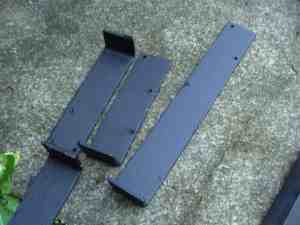
They are in two lengths to slope your PVs as close as possible to declination of the sun, in our case 31 degrees south.
They are of 6mm thick steel, 70mm broad, and either 450 or 350mm long in my case. It's not critical, but PVs will be more efficient if you can get the angle approximately right. Get some help from your mathematical son or daughter.
Here's an important little tip; make those brackets long enough that they clear the tiles by at least 100mm; you need room to seal around the bracket onto the tile.
You'll notice that I've drilled three holes, using a drill press, 8mm, two near the bottom for bolting onto the wooden beams in the ceiling, and one on the short curved part for the angle iron. Rustproof paint is essential.
They need to be spaced about a metre apart. The thicker your angle iron, the greater the distance. For my fourth array of four large panels I used 5mm angle iron and only two brackets.
That angle iron: 50 x 50mm x 5 mm thick
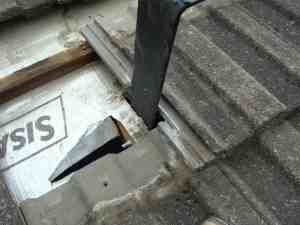
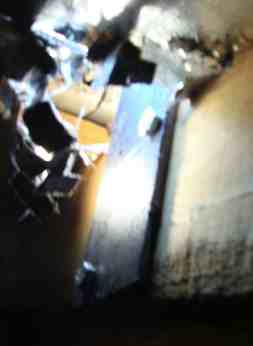
Pull back some tiles, slide the bracket through the underlay, sisillation in our case, drill through the beam and bolt the bracket firmly to the beam using high tensile bolts, nuts and washers. This next photo is taken from inside the roof.
SERIES AND PARALLEL SOLAR GENERATOR
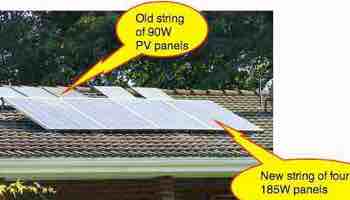
As you can see, I already have six smaller PVs in series, supplying 90W each. (540W total). At 18V each, 18x6 = 108V in series.
Now we are going to add a second string of four much larger panels (going at a greatly discounted price at the moment) in parallel with the first string. They are 4x185W = 740W. They provide 29V each, so in series, the voltage of the second string will be 118V.
Two schools of thought: The conventional one is that the two strings must be identical panels and have the same voltage. The second is that the strings must have similar total voltage (in this case 108V the first string, and 118V the second string) and use a stud diode to prevent one string from forcing energy back down the weaker string.
I have opted for the second opinion, but you should get some local advice. Those from the first school are adamant that the second school folk (me!) are all wrong.
Another factor is that it will confuse your MPPT that is designed to get the maximum out of your panels; but mine do very nicely despite the marginally different voltages.
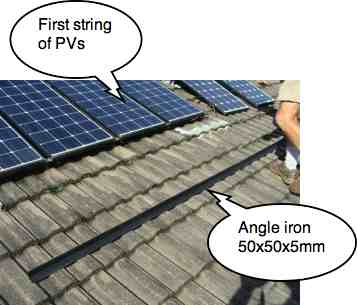
Angle iron
My advice is to use 5mm thick, 25x25mm angle iron. Then you need less brackets. My four panels are 950mm wide, so I needed two lengths, each 3.850m. About $20. You may have to purchase six metre lengths.
How diodes work
How diodes work is just a helper; you don't have to understand the inner workings of a car to drive it, nor to use this little chunk of silicone; there will be several in your solar generator if you use mismatched panels.
Here is the stud diode I'm using to balance my two solar generator panels; it's attached to a heat sink. The black arrow shows how the diode only allows current to flow in one direction. Note: this is a high amp diode, not one you pulled out of an old radio set! Get advice. This one must carry at least 600 watts. Best to get advice and get one that will easily carry the current. Inexpensive. $6. How diodes work ...
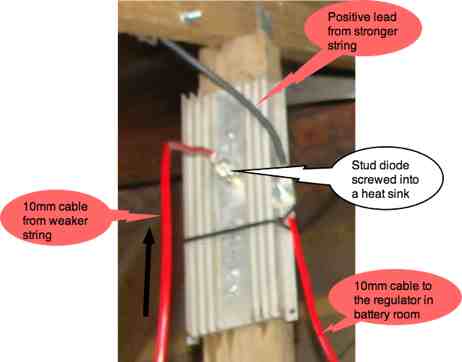
The angle iron for your solar generator
This needs to be fairly sturdy stuff; 50mm x 50mm to support your solar panel system. You have two choices; best is 5mm thick, and then you need only two or three brackets, 1.5m apart. Or 3mm thick in which case you'll need an extra bracket; four in my case. It's less work to pay a little extra for thick angle iron which then requires fewer brackets.
There will be two lengths; one to support the top of the PV panel and the other the lower side. My four panels are 950mm wide, so the lengths of angle iron are each 3850mm long.
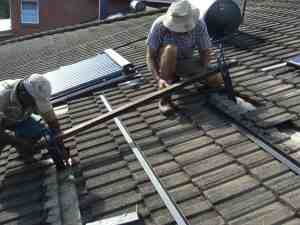
You will need a few extra pairs of hands to erect your solar generator. Most
of the time initially I was inside the roof, drilling and fitting the
brackets to the beams in the ceiling whilst my two helpers were on the roof. Actually, truth be known, I was the helper. My friend seen above is a very experienced construction man.
Newsletter
Our newsletter is entitled "create a cyan zone" at your home, preserving both yourself and Mother Earth for future generations; and the family too, of course. We promise not to spam you with daily emails promoting various products. You may get an occasional nudge to buy one of my books.
Here are the back issues.
- Lifestyle and ideal body weight
- What are ultra-processed foods?
- Investing in long-term health
- Diseases from plastic exposure
- Intensive lifestyle management for obesity has limited value
- A world largely devoid of Parkinson's Disease
- The impact of friendly bacteria in the tum on the prevention of cancer
- There's a hole in the bucket
- Everyone is talking about weight loss drugs
- Pull the sweet tooth
- If you suffer from heartburn plant a susu
- Refined maize meal and stunting
- Should agriculture and industry get priority for water and electricity?
- Nature is calling
- Mill your own flour
- Bake your own sourdough bread
- Microplastics from our water
- Alternative types of water storage
- Wear your clothes out
- Comfort foods
- Create a bee-friendly environment
- Go to bed slightly hungry
- Keep bees
- Blue zone folk are religious
- Reduce plastic waste
- Family is important
- What can go in compost?
- Grow broad beans for longevity
- Harvest and store sunshine
- Blue zone exercise
- Harvest and store your rainwater
- Create a cyan zone at your home
First drill a hole through the first bracket and bolt it to the beam. Then the second and fix it in place from within the ceiling.
Use, high tensile bolts please; you don't want srtrong winds launching your solar generator into orbit.
Repeat for the other three upper brackets. Get them in a nice straight line, and at the same height.
Use two lengths of timber slightly longer than the panels, marked with the panel length. Drill one hole and fit the first lower bracket.
Clamp the plank onto both brackets to get the orientation of the second bracket right before drilling the second holes in the beam for both brackets.
Repeat the process for all the brackets.
In the background you can see solar vacuum tubes capturing infrared energy from the sun for the water in the tank shown for our bathroom and kitchen. That water regular gets to 80 degrees celsius at the tap and boils in the geyser occasionally if we don't use any hot water during the day. I'm not exaggerating. Heating water is the greediest user of energy in the home. Fifty percent of your electricity bill is for heating water for the shower, bath, dishwasher and washing machine.
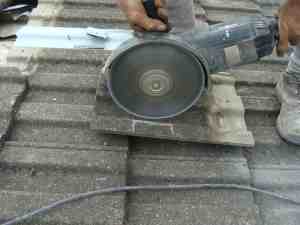
TILE CUTTING
Tiles need to be carefully cut with the angle grinder to make a snug fitting around the brackets. Be careful; this is a mean machine and accounts for quite a lot of industrial accidents.
Water proofing
This is a good moment to use a membrane and sealing compound to prevent any leaks into your roof; water proofing. At least three, preferably four coats of the paint; do it absolutely thoroughly or you'll have leeks; I did and rue not taking extra time to do it properly the first time.
Pull the tiles back into place.
Tip: More haste less speed. Once the panels are in place it's very difficult to get back to this joint. Make doubly certain the seal is perfect, with four coats of sealing compound. Best in fact to come back tomorrow, add two more coats of sealer, and then continue with your angle iron.
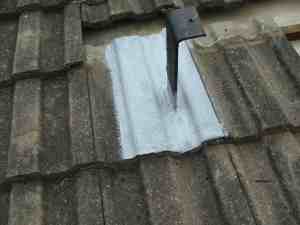
By guess and by God
Now place your first length of angle iron, say the lower one, in place and using your best judgement and a prayer, drill through the angle iron to coincide with the hole below in the bracket. Counter sink the hole for the bolt so the panel will lie flush in the angle iron.

Securely bolt with a washer below. Drill and countersink the next hole, and the tighten them all securely, remembering you will never return. Get them tight. Clean up the iron filings.
Use galvanised or better still stainless steel bolts.

Done. Four upper and four lower brackets securely bolted to the beams below, with the angle iron that will snugly and safely support your solar generator panels. The dust is from the angle grinder.
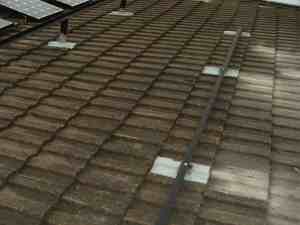
Now carefully lift the panels onto the roof; they aren't heavy but awkward and if there's a wind... it takes three people, two on the roof and one on the ground.
Slide them into place between the angle iron, no spaces between the panels. Now drill through the angle iron into the aluminium bracket of the panel and securely pop-rivet (large 4.8mm pops) or self tapping screws. Three top and three at the lower edge, six in total for each panel.
Just look, my solar generator is nearly complete.
Note below, the lower string of 185W panels are too near the roof; I should have made the brackets longer; we had a leak here and getting to the seal proved very difficult; give a clearance above the tiles of at least 10cm.

Which way should your PV panels face and at what angle. As a general rule, south in the northern hemisphere and vice versa in the southern hemisphere; and as close to the inclination of the sun at your latitude. 32 degrees would be my ideal, but my roof is 24 degrees so I've tilted them.
A new thought is that you should have some panels west facing; overall they will be less efficient but provide more energy in the late afternoon when the good wife may need it for cooking. Induction cooktop stoves use less than half the current of a conventional hob and work perfectly with a solar generator.
Connect the negative-to-positive cables from the panels in series, and then feed the last pair of cables, one positive, one negative, between the tiles and connect them securely below the roof.
If your panels are mismatched as mine are, then the positive lead of the weaker string must go first to the diode before being secured joined to the cable from the second string, and the cable to the regulator in the battery room. Lugs and ferrals, and solder, and a crimping tool are necessary. More about the inverter, regulator and battery room at this solar powered generator page ...
Tape up all the bare cables and secure them to the beams in the roof.
The last step in building your solar generator is to connect the negative terminal from each of your strings of panels. I have two strings in parallel, to there are two cables coming in. You may have only one if you have only one string. You could have three or even more. Crimp them securely using a crimping tool, preferably add solder to the feral.
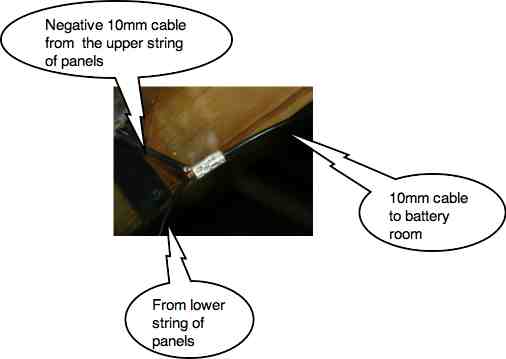
The losses in the wiring can be very significant, depending on the voltage and amps in your solar powered generator. As a general rule go for as high a voltage as you can, it reduces the losses. I'm using a 48V system.
And use cables as thick as you can afford and keep them short as possible. I've gone over the top rather with 10mm cable - influenced by someone who was very despondent over the failure of her home solar power system because of the huge losses in long, thin cables, and a low voltage system. This is all discussed in some detail at the solar powered generator page.
Good luck, and remember the Peter Principle. Get help, talk to lots of people, scour the web. If it doesn't excite you to gather and understand the facts, then get someone else to do the installation of your solar generator for you.
Next morning
I've been up early tidying up this page on building a home solar power generator. It's 5.30am (23rd February, late summer, and very exciting: my solar generator is already supplying twelve watts. That's enough for four LED globes. Within an hour I'll be making a pot of coffee for she-who-must-be-obeyed. She's enjoying her beauty sleep. Then she'll be making her daily loaf in the bread machine. The pool pump will come on at about 8am... all courtesy of the sun. Last night we could watch Robin William, the dead poet, when the grid failed. Again. Today I'll be enjoying some cricket between South Africa and Pakistan, all thanks to Mr Golden Sun, as my granddaughter says.
A paying proposition?
At this stage I haven't totaled my figures, so I'm not sure, but I can tell you we are consuming less than $5 per month from the grid. That's green...! I'll do an update in due course on the total costs. My friend who's done his homework says about seven years, excluding the cost of any blown appliances from mains surges; then you're looking at five years or less.
Output power
The solar charge controller or MPPT as it is called will give you the output power of the solar array; it's an essential part of your solar generator.
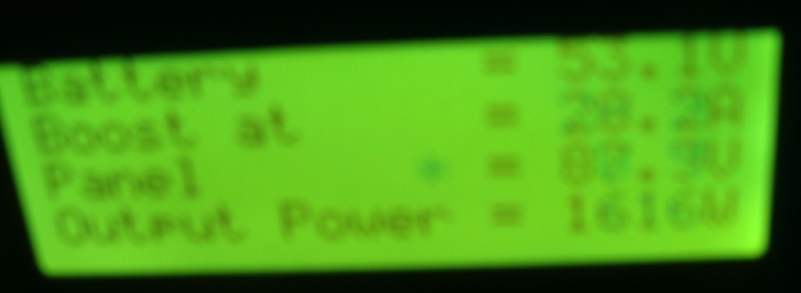
Battery = 53.1V
Boost at = 20.2A
Panel = 87.9V
Output power = 1616W
Now, that's a sight for sore eyes. The photo voltaic panels are providing 1.6kW of free solar power right now, and it's been even higher this morning. That's about 16c US, and 160c ZAR of free energy every hour. (1.6kWh)
Update: With yet another array of even larger new panels in place and functioning nicely we are peaking at 3.5kW of free solar energy. Enough to chlorinate the swimming pool and run the pool pump and reduce our reliance on the grid to less than 50kWh per month.
Turn the inverter off when you go to sleep
If you are off the grid this may not be possible, but you will save your batteries if you can turn the inverter off when you go to sleep at night, powering the fridge and a few lights with mains electricity from the utility.
Why, you may well ask? Because the inverter itself uses power; about 90 to 120 watts. That is quite a drain if you are using it only to provide electricity to a few essentials at night that draw little current.
By not draining your batteries below half you will get years more life out of them.
Having said that, now that we have changed over to lithium batteries we find it no longer necessary. The next step is to purchase an electric vehicle that we can charge for free.
Notice that going solar is a step by step process; but if you are serious about this business always start with a large inverter, certainly not less than 5kW. An upgrade will cost you time and money. Also, you will be frequently drawing power near its maximum which will shorten its life.
Upgrading your system
Do yourself a big favour; do a lot of planning and talking to others before making a start; otherwise you'll find yourself making a solar powered generator upgrade; it makes a lot more sense to build as big a solar generator as you can afford from the start. Then it hurts only once; upgrading your system by buying larger components is an expensive and tedious business.
I should have done it from the beginning, but it was only when I started upgrading my system that a friend pointed out the immense electrical power stored in these large batteries; enough to do a lot of damage if there was a dead short; an inexpensive knifeblade fuse is the solution.
Induction cooktop stoves
Induction cooktop stoves should be in every kitchen, whether you're a greenie or not; having a solar generator is simply one step further up.
Going green will get you into new innovations; one of them is the induction cooktop stoves and hot water kettle. Instant heat, requiring less than half the energy, so it's perfect for use with a solar generator. It's like cooking with gas, only faster and cheaper.
Buy LED light bulbs too; they use about a twentieth of a conventional light globe.
USEFUL LINKS
- Grid-tied solar system
- Go from this sunshine generator to SOLAR POWER ENERGY homepage ...
- Organic green foods, they too capture sunshine.
When browsing use right click and Open Link in New Tab, or you may get a bad gateway signal.
Retirement sentiments
So, what do you plan to do, sir, when you quit work? Have you any retirement sentiments? Women don't tend to have a problem; they always seem to have plenty to keep them entertained. But men either choose some worthwhile retirement projects, or drop dead of boredom. I've seen it so often at the chiropractic coalface; mine was to build a solar generator. Well, that was just the beginning; then there was harvesting rainwater and currently it's keeping hens for "proper" eggs.
Here are a few thoughts about retirement sentiments for you to peruse.
Use the Site Search function in the navigation bar on your left to find the links to those topics highlighted in bold.
Peter principle
After sixteen rejections by publishers, Laurence Peter's book was accepted and within one year the hard cover edition was reprinted a massive fifteen times. Peter Principle has sold over eight million copies in thirty eight languages. After sixteen rejections! I'll bet there are some publishers who are smarting.
Whilst Bernard Preston's books haven't been rejected, they have hardly made me an overnight success and I'm yet to reach ten thousand copies! You'll find them a lot more fun than a lot of the trash that you'll find on bookshop shelves. Try me... just a few dollars.
You could help do that what buying one of the very inexpensive ebook versions for your Kindle, tablet or smartphone.
Like to read something different? Try my trilogy, A Family Affair reviews.
Have you read my latest trilogy? Only $1.14 each. Hold onto your hat. Find A Family Affair by Bernard Preston at Amazon.
Did you find this page interesting? How about forwarding it to a friendly book or food junkie? Better still, a social media tick would help.
- Bernard Preston homepage
- Solar geek
- Solar Generator
Address:
56 Groenekloof Rd,
Hilton, KZN
South Africa
Website:
https://www.bernard-preston.com